How to edit real estate images for stunning listings fast
How to edit real estate images for stunning listings fast

TL;DR:
- High-quality, well-edited listing photos attract more clicks, inquiries, and faster offers for real estate sales. Using AI-powered editing tools and a strategic workflow, agents can enhance images quickly while maintaining authenticity and viewer trust. Avoid over-editing and ensure consistency to maximize the impact of your property images.
A single photo can make or break a buyer’s decision to schedule a showing. Listings with sharp, well-lit, professionally edited images consistently attract more clicks, more inquiries, and faster offers. The gap between an amateur snapshot and a polished listing photo is not about expensive cameras or years of training. It’s about knowing the right editing steps and using tools that work quickly without sacrificing quality. This guide walks you through exactly what to do, from gathering your tools to checking your final results.
Table of Contents
- What you need to edit real estate images
- Step-by-step process: Editing your real estate photos
- Avoiding common mistakes in real estate editing
- How to tell if your editing worked
- Why smart editing beats ‘more editing’ for real estate
- Ready to level up your real estate photos?
- Frequently asked questions
Key Takeaways
| Point | Details |
|---|---|
| Gather the right tools | All you need is a computer and AI-powered or online software to start editing. |
| Follow simple editing steps | Adjust lighting, color, and remove distractions to make your property photos stand out quickly. |
| Prioritize subtle enhancement | Overediting can hurt credibility; focus on clean, attractive results instead. |
| AI saves time | AI-based editing tools automate repetitive tasks, so you get more listings done faster. |
| Verify before you list | Use a checklist and before-after views to make sure your edits help, not hinder, your property marketing. |
What you need to edit real estate images
Before you can edit, let’s clarify exactly what you’ll need to get started.
Hardware and file formats matter more than you think. Most modern smartphones shoot in JPEG, which is perfectly usable for listing photos. If you’re working with a DSLR or mirrorless camera, shooting in RAW format gives you far more flexibility when adjusting exposure and color in post-production. RAW files retain all the data the sensor captured, while JPEG files compress that data. For quick turnaround listings, JPEG works fine. For luxury properties where image quality is a selling point, RAW is worth the extra steps.
A computer with at least 8GB of RAM will handle most editing tasks without slowdowns. A calibrated monitor (one that displays accurate colors) is a smart investment if you edit regularly, because what looks great on an uncalibrated screen might appear washed out or overly warm on a buyer’s device.
Software options range from free to professional grade. Here’s a quick comparison to help you choose:
| Software type | Cost | Best for | Speed |
|---|---|---|---|
| AI-powered platforms | Free to low monthly | Agents, homeowners, fast edits | Under 30 seconds per image |
| Desktop editors (manual) | Moderate to high annual fee | Professional photographers | 10 to 30 minutes per image |
| Mobile apps | Free to low cost | Quick on-the-go touch-ups | 2 to 10 minutes per image |
| Batch processing tools | Varies | High volume portfolios | Depends on queue |
AI photo editing tools streamline the workflow for real estate professionals by cutting the time spent on repetitive tasks like sky replacement, brightness balancing, and object removal. If you’re not a trained photographer, starting with an AI-powered tool saves you from a steep learning curve.
Your pre-editing checklist:
- Select only your sharpest, best-composed shots. Editing cannot fix a blurry image.
- Cull duplicates before you start. Editing 8 great photos beats editing 40 mediocre ones.
- Review interior lighting tips before the shoot if possible, since good source lighting dramatically reduces editing time.
- Back up original files before making any changes.
- Standardize your image resolution. Most listing platforms recommend 1024 x 768 pixels minimum, but higher is better for zoom-enabled listings.
Building a streamlined AI editing workflow from day one saves hours across a busy selling season.
Pro Tip: Always rename your files with a consistent system before editing, such as “123MainSt_LivingRoom_01.jpg.” This prevents confusion when uploading to multiple listing platforms and keeps your archive organized.
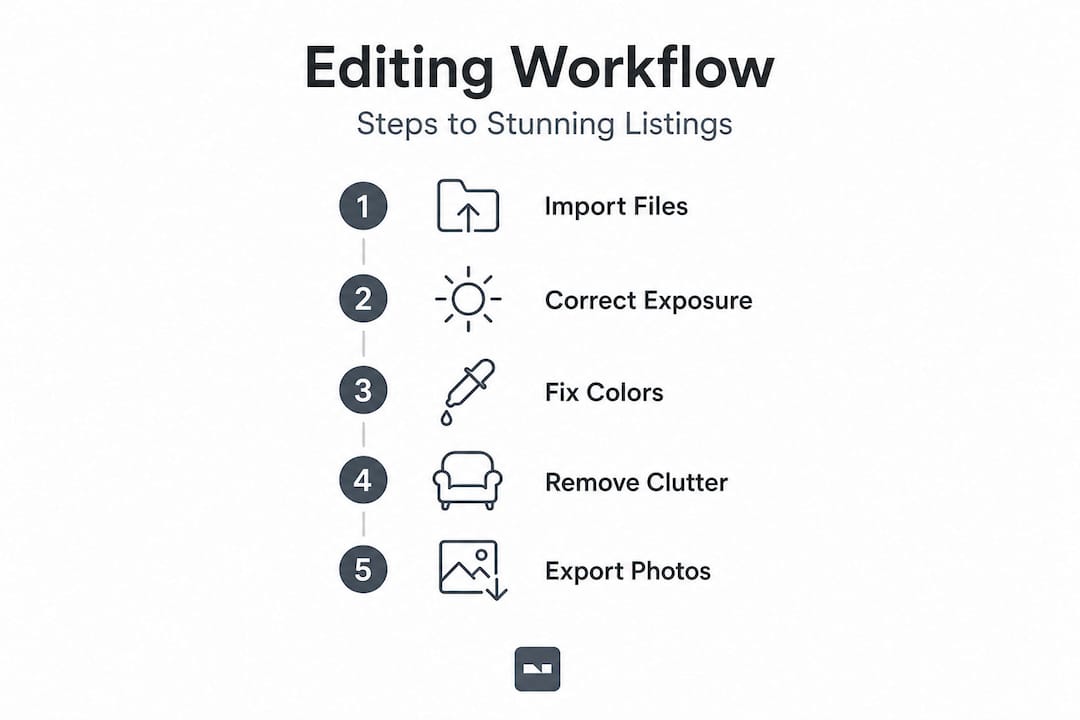
Step-by-step process: Editing your real estate photos
With the right tools ready, here’s exactly how to enhance your images step-by-step.
Step 1: Correct exposure and brightness first. This is the single most impactful adjustment. Underexposed rooms look small and uninviting. Overexposed shots blow out windows and wall details. Aim for a balanced exposure where both shadow areas and highlights retain visible detail.
Step 2: Balance the white balance and colors. Rooms often have mixed light sources, tungsten bulbs, natural daylight, and sometimes LED strips all in one shot. Correcting white balance removes that unwanted orange or blue cast. Use the “auto white balance” feature as a starting point, then fine-tune manually if the result still looks off.
Step 3: Straighten vertical and horizontal lines. Distorted verticals, known as “keystoning,” make rooms look warped or unprofessional. Most AI tools fix this automatically. In manual software, use the lens correction or perspective tool to make walls and door frames perfectly vertical.
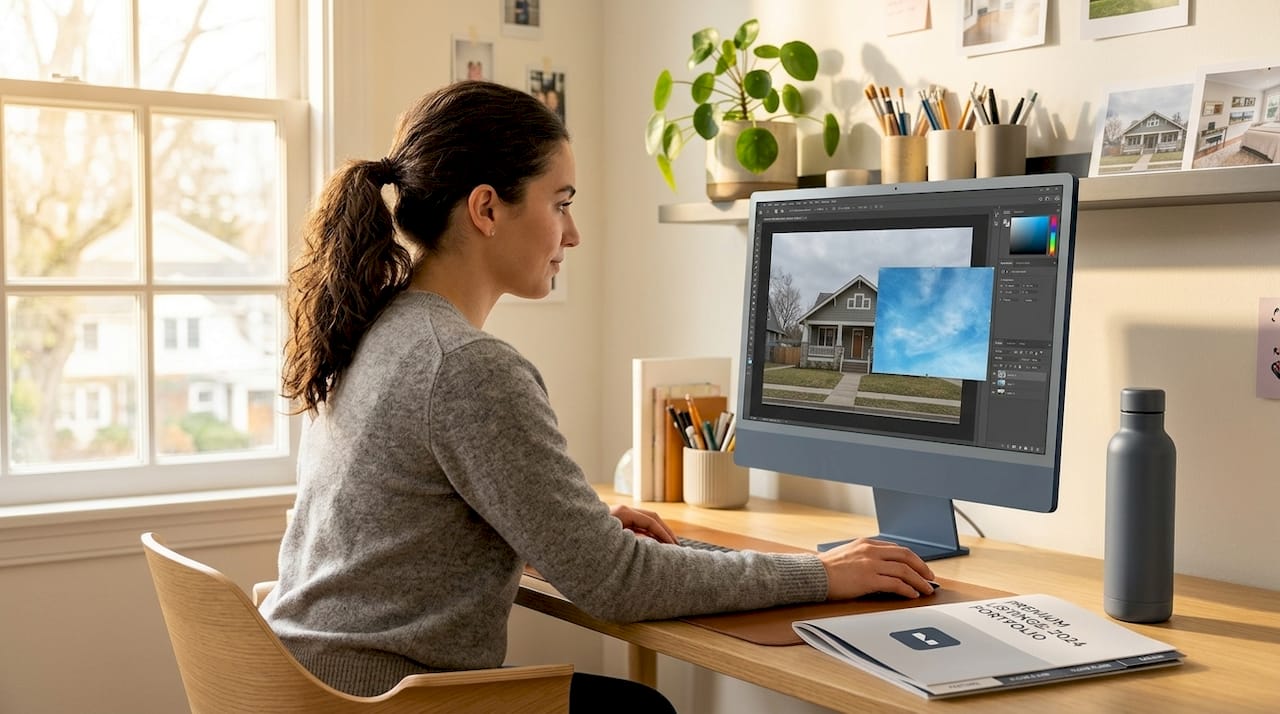
Step 4: Remove distractions and unwanted objects. A trash bin in the corner, a pet toy on the floor, or a car in the driveway can all pull attention away from the property’s best features. AI-powered object removal tools handle this in seconds. Professional quality photo editing at this level can significantly enhance the appeal of real estate images and the perceived value of a space.
Step 5: Enhance outdoor shots with sky replacement. An overcast gray sky deflates curb appeal immediately. Replacing it with a clear blue sky is one of the most effective single edits you can make. Keep it realistic, though. A dramatic sunset sky on a standard daytime exterior shot looks staged and untrustworthy.
Step 6: Apply virtual staging if rooms are empty. Vacant rooms are harder for buyers to visualize as livable spaces. Virtual staging, which uses AI to digitally add furniture and decor, dramatically improves engagement. Research consistently shows that increasing property value perception through staging, even virtual staging, leads to faster and higher offers.
Step 7: Export at the correct resolution and file size. Most MLS platforms cap uploads at 5MB per image. Export at full quality but check file size before uploading. JPEGs compressed to roughly 2 to 4MB usually hit the sweet spot between quality and upload speed.
Here’s how manual editing compares to AI-driven editing on key tasks:
| Editing task | Manual editing time | AI editing time | Quality outcome |
|---|---|---|---|
| Exposure correction | 3 to 5 minutes | Under 10 seconds | Comparable |
| Object removal | 5 to 15 minutes | Under 30 seconds | AI slightly less precise |
| Virtual staging | Hours or outsourced | 30 to 60 seconds | AI very competitive |
| Sky replacement | 5 to 10 minutes | Under 15 seconds | Comparable |
| White balance fix | 2 to 4 minutes | Under 10 seconds | Comparable |
AI real estate editing can automate most basic photo edits, saving substantial time for agents who need to publish listings quickly. For high-volume agents handling multiple listings per week, that time difference is significant.
Pro Tip: Always keep a copy of the pre-staged image alongside the virtually staged version. Some platforms and buyers require disclosure that staging is digital, and having both versions ready protects you legally and ethically. Listings with great photos are also proven to support editing for fast sales when the images are handled strategically.
Avoiding common mistakes in real estate editing
Even the best editors can slip up. Here’s how to avoid the most common traps.
Real estate photo editing mistakes often come in two flavors: technical errors that make images look amateurish, and overcorrection errors that make them look fake. Both hurt your listing’s credibility.
Common mistakes to watch out for:
- Over-saturating colors. Cranking up the saturation makes grass unnaturally green and walls look like they belong in a cartoon. Buyers notice and trust drops fast.
- Ignoring lens distortion. Wide-angle lenses make rooms look larger, which is useful, but extreme distortion warps walls and makes spaces look physically impossible.
- Removing too much. Erasing every shadow, every texture, and every piece of furniture until the room looks like a white box does not help buyers visualize living there.
- Inconsistent editing across a listing. If your kitchen photos look warm and inviting and your bathroom photos look cold and clinical, the listing feels disjointed. Buyers pick up on this even if they can’t name it.
- Fake HDR effects. The heavy “glow” look from aggressive HDR processing was popular years ago and now signals outdated or low-quality work.
- Misrepresenting room size or layout. Using extreme wide-angle distortion to make a small bedroom look spacious is not just a stylistic choice, it’s a trust issue.
“Real estate photography should enhance what’s actually there, not invent something that isn’t. Buyers who arrive expecting one thing and find another leave with a damaged impression of both the property and the agent.”
Effective real estate photo editing follows best practices designed to attract more viewers while keeping expectations aligned with reality. Buyers who feel misled rarely come back, and online reviews travel fast in local markets.
Use the fast property edits guide as a reference when you need to move quickly without cutting corners.
Pro Tip: After finishing your edits, step away for 10 minutes and then look at the images again. Fresh eyes catch oversaturation, unnatural lighting, and weird color casts that you stop noticing after staring at the same image for a while.
How to tell if your editing worked
Once you’ve made your edits, here’s how to be sure your images are making the right impact.
Knowing when to stop editing is a real skill. More edits do not automatically mean better photos. Here’s a practical checklist to evaluate your results before you publish:
- Brightness: Does the room look naturally well-lit without blown-out windows or crushed shadows?
- Color accuracy: Do the wall colors, flooring, and countertops look close to their real-life appearance?
- Lines: Are walls, door frames, and countertops visually straight?
- Distractions removed: Is the viewer’s eye drawn to the space itself, not clutter or objects?
- Consistency: Do all images in the listing share a similar tone and brightness level?
- Resolution: Are images sharp when zoomed in on a laptop or large tablet screen?
Before-and-after comparison is the most direct way to confirm your work had the intended effect:
| Feature | Before editing | After editing |
|---|---|---|
| Exposure | Flat, dark, or washed out | Balanced, inviting brightness |
| Color tone | Orange or blue cast from mixed lighting | Neutral, true-to-life colors |
| Vertical lines | Leaning or distorted walls | Straight and proportional |
| Background distractions | Visible clutter or personal items | Clean, neutral backdrop |
| Sky (exterior shots) | Gray, overcast, or blank | Clear blue or natural daytime look |
| Perceived room size | Cramped or uninviting | Open and livable |
Homes with professionally edited images sell faster and attract significantly more attention online. That performance difference comes from buyers spending more time on listings where images feel polished and trustworthy.
Getting an outside perspective adds real value at this stage. Share your edited photos with a colleague, a friend who hasn’t seen the property, or a trusted client. Ask them one question: “Does this look like a place you’d want to see in person?” If the answer is hesitant, go back and review the staging photo tips that work for your property type.
You can also use a seamless results guide to cross-check your finished images against a proven standard before posting.
Why smart editing beats ‘more editing’ for real estate
Most editing tutorials focus on what to add: more brightness, more saturation, more sharpness, more virtual furniture. But the agents and homeowners who consistently get the best results from their listing photos think about editing differently. They focus on what to reveal, not what to create.
Over-editing has a measurable cost. Images that look too perfect trigger what buyers often describe as an uncanny valley effect, a vague sense that something is off without being able to pinpoint why. That feeling translates directly into lower trust and fewer showing requests. You can have technically flawless images that still perform poorly because they look artificial.
The most effective editing strategy is to remove what distracts and correct what misleads, while leaving the authentic character of the space intact. A slightly worn hardwood floor with good light looks honest and livable. That same floor scrubbed clean with digital tools and over-sharpened until it gleams looks fake. Buyers know the difference even when they can’t explain it.
Speed matters here too. Agents who use AI-powered editing tools are not just saving time, they’re publishing better listings faster, which means more days at the top of search results and more buyer eyes before the listing gets buried. The benefits of fast editing go well beyond convenience. Listings published within 24 hours of professional photography consistently outperform listings where photos were delayed by days of manual editing.
The strategic mindset shift is this: treat editing as a filter, not a paintbrush. Your job is to show the property at its honest best, not to construct an idealized version that sets buyers up for disappointment.
Ready to level up your real estate photos?
If you’ve been spending hours on manual edits or settling for flat, unpolished listing photos, there’s a faster path to professional results. VibeMyFlat combines AI-powered editing with a natural language interface, meaning you describe what you want changed and the tool does it in under 30 seconds.

Whether you need to brighten a dim living room, swap out a gray sky, remove clutter, or virtually stage an empty bedroom, VibeMyFlat handles it without requiring any design background or complex software. Available on web, iOS, and Android, it fits directly into your listing workflow. Stop letting slow editing hold your listings back. Try it today and see the difference a well-edited photo makes the moment a buyer lands on your listing.
Frequently asked questions
Do I need expensive software to edit real estate images?
No, many effective AI-powered and online tools are free or low-cost. AI tools automate most edits, saving substantial time without requiring expensive subscriptions.
What are the most important edits for real estate photos?
Key edits include brightness correction, white balance, straightening vertical lines, and removing distracting objects. Professional quality photo editing on these core elements significantly enhances a listing’s appeal.
Can AI tools replace manual photo editing for listings?
AI tools handle most edits quickly and accurately, though some manual adjustments can still refine the final result. AI editing tools streamline the workflow for real estate professionals without eliminating the option for manual fine-tuning.
How do I know if my photos are over-edited?
If your images look unrealistic or fail to match the property’s actual appearance, you’ve likely pushed the edits too far. Best practices for real estate editing keep enhancements grounded in what buyers will actually encounter at the showing.